Following a user with Google Maps for Flutter

April 8, 2020
In this article we will build a small application that uses GeoLocator and Google Maps to continuously stream the user's position, updating the camera position as the user changes location.
Start by getting the latest versions of GeoLocator, Google_Maps_Flutter and Provider from pub.dev and pasting then into pubspec.yaml
/* pubspec.yaml */

  # The following adds the Cupertino Icons font to your application.
  # Use with the CupertinoIcons class for iOS style icons.
  cupertino_icons: ^0.1.2
  geolocator: ^5.3.1
  provider: ^4.0.4
  google_maps_flutter: ^0.5.25+3
}
We'll need to setup permissions for Geolocator and also obtain and store the API key for Google Maps. Head over to
your Google Cloud Console If
you do not already have a project, create one. Inside you project menu, select APIs & Services and select
Library from the flyout.
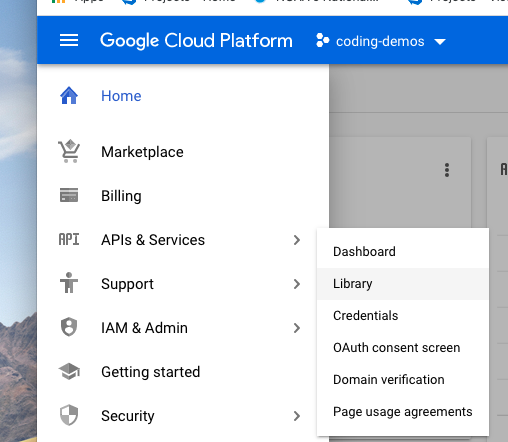
Inside the library page search and locate Maps SDK for Android and Maps SDK for IOS and enable each.

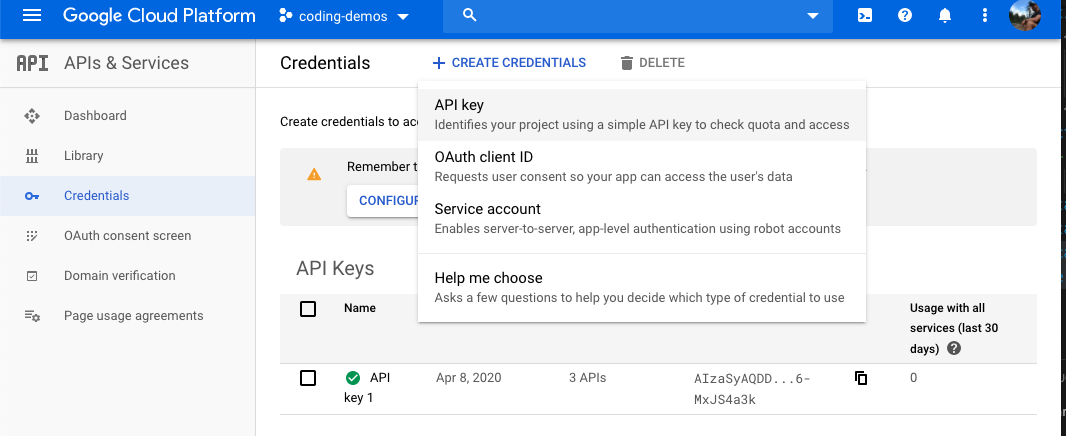
On the menu, again select APIs & Service, but this time select Credentials from the flyout. You will need an
API Key to access the map,
if you do not already have one, click + Create Credentials at the top of the page and select API key from the
dropdown. Your key should now be displayed. Keep this page open, you will need to copy and paste it later.
To complete Android setup, open Android -> app -> main -> AndroidManifest.xml. Just before the closing application
tag, insert this line
and place your key inside. <meta-data android:name="com.google.android.geo.API_KEY"
android:value="YOUR_KEY"/>. Just after the closing application
tag and before the closing manifest tag, put in this tag to give Geolocator permissions <uses-permission
android:name="android.permission.ACCESS_FINE_LOCATION" />
The bottom of your AndroidManfifest file should now look like this.

To complete IOS setup, open ios -> Runner -> AppDelegate.swift. Insert and import for GoogleMaps after the Flutter import, and insert GMSServices.provideAPIKey("YOUR_KEY") inside the function at the bottom, replacing the placeholder with your key. Your AppDelegate.swift should now look like below.
import UIKit
import Flutter
import GoogleMaps

@UIApplicationMain
@objc class AppDelegate: FlutterAppDelegate {
  override func application(
    _ application: UIApplication,
    didFinishLaunchingWithOptions launchOptions: [UIApplication.LaunchOptionsKey: Any]?
  ) -> Bool {
    GMSServices.provideAPIKey("YOUR_KEY")
    GeneratedPluginRegistrant.register(with: self)
    return super.application(application, didFinishLaunchingWithOptions: launchOptions)
  }
}
One last step for IOS, in the same folder, open Info.plist and paste these four lines at the bottom (before the closing dict tag) to allow embeded map views and enable Geolocator
<key>NSLocationWhenInUseUsageDescription</key>
<string>This app needs access to location when open.</string>
<key>io.flutter.embedded_views_preview</key>
<string>YES</string>
With setup out of the way, it's time to build. Start by creating a services folder inside the lib directory. Inside this directory create a file called geolocator_service.dart. This file will hold the functions necessary to interact with the Geolocator API.
We will build both a future and a stream call to the GeoLocator. The Future will be used to determine the initial camera position. The map will not load until this future has resolved. After the map has been loaded we will call the stream to take over the camera positioning using a map controller. The stream can be configured with a distanceFilter property that specifies how far the user should travel (in meters) before an event is emitted. In this example the stream will send an event every time the device moves 10 meters. Paste this code inside geolocator_service.dart
import 'package:geolocator/geolocator.dart';

class GeolocatorService {
  final Geolocator geo = Geolocator();

  Stream getCurrentLocation(){
    var locationOptions = LocationOptions(accuracy: LocationAccuracy.high, distanceFilter: 10);
    return geo.getPositionStream(locationOptions);
  }

  Future getInitialLocation() async {
    return geo.getCurrentPosition(desiredAccuracy: LocationAccuracy.high);
  }
}
Now let's create the Map. Create a screens folder inside the lib directory. Inside the screens create a new file called map.dart and paste in the code below.
/* map.dart */
import 'dart:async';
import 'package:flutter/material.dart';
import 'package:geolocator/geolocator.dart';
import 'package:google_maps_flutter/google_maps_flutter.dart';
import 'package:mapfollow/services/geolocator_service.dart';
class Map extends StatefulWidget {
final Position initialPosition;
Map(this.initialPosition);
@override
State createState() => _MapState();
}
class _MapState extends State
A StatefulWidget is necessary so that a controller can be used to adjust the camera position after the Map widget is rendered. The initState function is used to setup the geolocator stream and a CenterScreen function is created to adjust the camera position with each event emitted by the stream. The GoogleMap widget requires an initial position before it can be rendered to the device, to ensure that this happens the initial position is a required parameter of the map class. We will take care of this in main.dart. Let's move there now.
Clear out the contents of main.dart and replace them with the code below.
/* main.dart */

import 'package:flutter/material.dart';
import 'package:geolocator/geolocator.dart';
import 'package:mapfollow/services/geolocator_service.dart';
import 'package:provider/provider.dart';
import './screens/map.dart';

void main() => runApp(MyApp());

class MyApp extends StatelessWidget {
  final geoService = GeolocatorService();
  @override
  Widget build(BuildContext context) {
    return FutureProvider(
      create: (context) => geoService.getInitialLocation(),
      child: MaterialApp(
        title: 'Flutter Demo',
        theme: ThemeData(
          primarySwatch: Colors.blue,
        ),
        home: Consumer(
          builder: (context, position, widget) {
            return (position != null)
                ? Map(position)
                : Center(child: CircularProgressIndicator());
          },
        ),
      ),
    );
  }
}
main.dart is responsible for calling for the intial position that map.dart needs in order to render the Google Map. This is accomplished by calling the service inside the future provider and using a Consumer widget to resolve the position and pass it to the Map widget. While the position remains null a CircularProgressIndicator is displayed on the sceen.
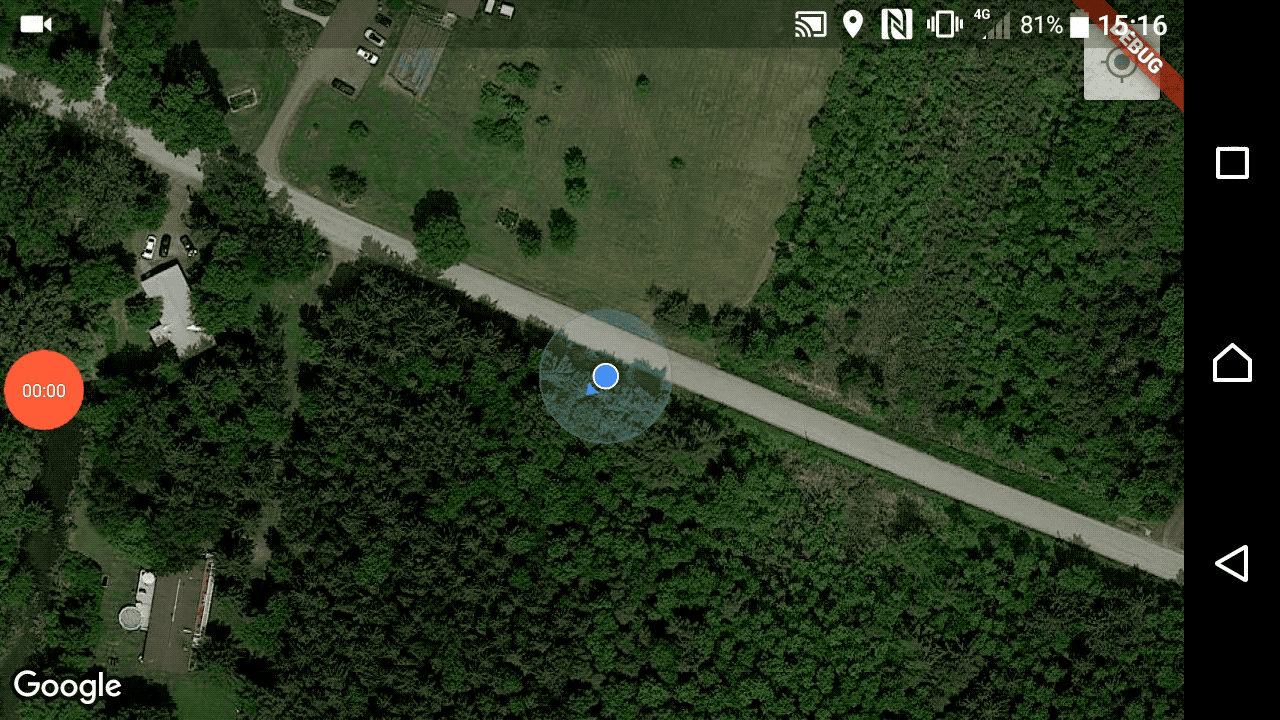
That's it. Fire up the app on your device and take it for a walk. The map should adjust to your position and slide to center itself each time the stream emits a value.